Manual article / Small-scale Aquaponic Food Production
Management and troubleshooting
A sourced, attributed collection from its original edition.
On this page
The previous chapters focused on the importance of bacteria to ensure good growth of both plants and fish, on the key factors when building the different aquaponic units, and how to properly care for both fish and plants in a single aquaponic unit. This chapter summarizes the main principles and "rules of thumb" to provide a reference on the optimal fish-to-plant ratio, feeding regime and biofilter sizing.
Component calculations and ratios
Original publication · First published on FarmHub Learn · Food and Agriculture Organization of the United Nations
Aquaponic systems need to be balanced. The fish (and thus, fish feed) need to supply adequate nutrients for the plants; the plants need to filter the water for the fish. The biofilter needs to be large enough to process all of the fish wastes, and enough water volume is needed to circulate this system. This balance can be tricky to achieve in a new system, but this section provides helpful calculations to estimate the sizes of each of the components.
Plant growing area, amount of fish feed and amount of fish
The most successful way to balance an aquaponic system is to use the feed rate ratio described in Section 2.1.4. This ratio is the most important calculation for aquaponics so that the fish and plants can thrive symbiotically within the aquaponic ecosystem.
The ratio estimates how much fish feed should be added each day to the system, and it is calculated based on the area available for plant growth. This ratio depends on the type of plant being grown; fruiting vegetables require about one-third more nutrients than leafy greens to support flowers and fruit development. The type of feed also influences the feed rate ratio, and all calculations provided here assume an industry standard fish feed with 32 percent protein.
| Leafy green plants | Fruiting vegetables |
|---|---|
| 40-50 g of fish feed per square metre per day | 50-80 g of fish feed per square metre per day |
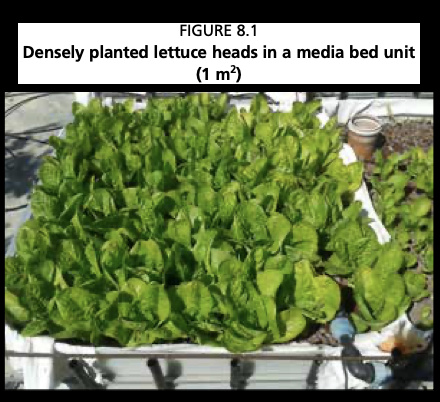
The recommended first step in the calculation is to determine how many plants are desired. On average, plants can be grown at the planting density shown below (Figure 8.1). These figures are only averages, and many variables exist depending on plant type and harvest size, and therefore should only be used as guidelines.
| Leafy green plants | Fruiting vegetables |
|---|---|
| 20-25 plants per square metre | 4-8 plants per square metre |
Once the desired number of plants has been chosen, it is then possible to determine the amount of growing area needed and, consequently, the amount of fish feed that should be added to the system every day can be determined.
Once the amounts of growing area and fish feed have been calculated, it is possible to determine the biomass of the fish needed to eat this fish feed. Different-sized fish have different feed requirements and regimes, this means that many small fish eat as much as a few large fish. In terms of balancing an aquaponic unit, the actual number of fish is not as important as the total biomass of fish in the tank. On average, for the species discussed in Section 7.4, the fish will consume 1-2 percent of their body weight per day during the grow-out stage. This assumes that the fish are larger than 50 g because small fish eat more than large ones, as a percentage of body weight.
| Fish feeding rate | |
-- | | 1-2 % of total body weight per day |
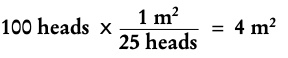
The example below demonstrates how to conduct this set of calculations, determining that, in order to produce 25 heads of lettuce per week, an aquaponic system should have 10-20 kg of fish, fed 200 grams of feed per day, and have a growing area of 4 m2. The calculations are as follows:
Lettuce requires 4 weeks to grow once the seedlings are transplanted into the system, and 25 heads per week are harvested, therefore:
Each 25 heads of lettuce require 1 m2 of growing space, therefore:
Each square metre of growing space requires 50 g of fish feed per day, therefore:
The fish (biomass) in a system eats 1–2 percent of their body weight per day,
therefore:



Although extremely helpful, this feed ratio is really only a guide, particularly for small-scale units. There are many variables involved with this ratio, including the size and type of fish, water temperature, protein content of the feed and nutrient demands of the plants, which may change significantly over a growing season. These changes may require the farmer to adjust the feeding rate.
Testing the water for nitrogen helps to determine if the system remains in balance. If nitrate levels are too low (less than 5 mg/litre), then slowly increase the feed rate per day without overfeeding the fish. If the nitrate levels are stable, then there may be deficiencies in other nutrients and supplementation may be required especially for calcium, potassium and iron. If nitrate levels are increasing, then occasional water exchanges will be necessary as nitrate rises above 150 mg/litre. Increasing nitrate levels suggest that the concentration of other essential nutrients is adequate.
Water volume
The water volume is most important to the aquaculture aspect of aquaponics. Different stocking densities affect fish growth and health, and are one of the most common root causes for fish stress. However, the total water volume does not affect the hydroponic component, except that with large volumes of water it takes more time for the water to accumulate a substantial nutrient concentration during the initial cycling. Thus, if a unit has a relatively large water volume, the only impact is that it would take longer to reach the optimal nutrient concentrations for plants. Large water volumes help to mitigate changes in water quality, but may mask problems for longer. The DWC method always has a higher total water volume than the NFT or media beds.
The recommended maximum stocking density is 20 kg of fish for 1 000 litres of water (fish tank). The small-scale units described in this publication have about 1 000 litres of water and should contain 10-20 kg of fish. Higher stocking densities require more sophisticated aeration techniques to keep the DO levels stable for fish, as well as a more complex filtration system to deal with the solid waste. New aquaponic farmers are strongly recommended not to exceed the stocking density of 20 kg per 1 000 litres. This is particularly the case where a constant electricity supply is not guaranteed, because a brief interruption can kill all of the fish within an hour at high stocking densities. This same stocking density applies for any size tank larger than 500 litres; simply use this ratio to calculate the maximum stocking density for the given volume of water. If the tank is smaller than 500 litres, reduce stocking density to one-half, or 1 kg per 100 litres, though it is not recommended to grow fish for consumption in a tank smaller than 500 litres. For reference, an average tilapia weighs 500 g at harvest size and 50 g at stocking size.
| Fish stocking density | |
- | | 10-20 kg of fish per 1 000 litres of water |
Filtration requirements - biofilter and mechanical separator
The amount of biofiltration necessary in aquaponics is determined by the amount of feed entering the system daily. The main consideration is the type of biofilter material and surface area of that medium. The larger the surface area, the larger the bacterial colony that can be hosted and the faster ammonia is converted into nitrate. Two ratios are provided, one for the volcanic gravel found in media beds, and one for the Bioballs® found in NFT and DWC units. This calculation should be considered a minimum, and excess biofiltration does not harm the system but rather makes the system more resilient against ammonia and nitrite spikes. Biofilters should be oversized if it is suspected that low temperatures could affect bacterial activity. Appendix 4 contains more information on sizing biofilters and calculating the volume required.
| Biofilter material | Specific surface area (m²/m³) | Volume required (litres/g of feed) |
|---|---|---|
| Volcanic gravel | 300 | 1 |
| Bioballs® | 600 | 0.5 |
The mechanical separator should be sized based on the volume of water. Generally, the mechanical separator should have a volume of 10-30 percent of the fish tank size. Mechanical filters are needed for both the NFT and DWC systems, as well as media bed systems with high stocking densities (> 20 kg/1 000 litres).
Summary of component calculations
-
The feed rate ratio provides a way to balance the components of an aquaponic system, and to calculate planting area, fish feed, and fish biomass.
-
Feed rate ratio for aquaponics:
-
40-50 grams of daily feed per square metre (leafy greens);
-
50-80 grams of daily feed per square metre (fruiting vegetables).
-
Fish feeding rate: 1-2 percent of their body weight per day.
-
Fish stocking density: 10-20 kg/1 000 litres.
-
Biofiltration volume:
-
1 litre per gram of daily feed (cinders in media beds)
-
½ litre per gram of daily feed (Bioballs® in NFT and DWC)
Table 8.1 summarizes the key figures and ratios for designing small-scale media bed, NFT and DWC units. It is important to be aware that the figures are just guides as other external factors (e.g. climate conditions, access to a constant supply of electricity) may change the design on the ground. Please note the footnotes below the table explaining the figures and the applicability of each column per aquaponic method.
TABLE 8.1
Practical system design guide for small-scale aquaponic units
| Fish tank volume (litre) | Max. fish biomass1 (kg) | Feed rate2 (g/day) | Pump flow rate (litre/h) | Filters volume3 (litre) | Min. volume of biofilter media4 (litre) | Plant growing area5(m²) | |
| Volcanic tuff | Bioballs® | ||||||
| 200 | 5 | 50 | 800 | 20 | 50 | 25 | 1 |
| 500 | 10 | 100 | 1 200 | 20–50 | 100 | 50 | 2 |
| 1 000 | 20 | 200 | 2 000 | 100–200 | 200 | 100 | 4 |
| 1 500 | 30 | 300 | 2 500 | 200–300 | 300 | 150 | 6 |
| 2 000 | 40 | 400 | 3 200 | 300–400 | 400 | 200 | 8 |
| 3 000 | 60 | 600 | 4 500 | 400–500 | 600 | 300 | 12 |
Notes:
1. The recommended fish density is based on a maximum stocking density of 20 kg/1 000 litres. Higher densities are possible with further aeration and mechanical filtration, but this is not recommended for beginners.
2. The recommended feeding rate is 1 percent of body weight per day for fish of more than 100 g of body mass. The feeding rate ratio is: 40-50 g/m2 for leafy greens; and 50-80 g/m2 for fruiting vegetables.
3. The volumes for mechanical separator and biofilter should be 10-30 percent of total fish tank volume. In reality, the choice of containers depends on their size, cost and availability. Biofilters are only needed for NFT and DWC units; mechanical separators are applicable for NFT, DWC units and media bed units with a fish density of more than 20 kg/1 000 litres.
4. These figures assume the bacteria are in optimal conditions all the time. If not, for a certain period (winter), extra filtration media may need to be added as a buffer. Different values are provided for the two most common biofilter media based on their respective specific surface area.
5. Figures for plant growing space include only leafy greens. Fruiting vegetables would have a slightly lower area.
Source: Food and Agriculture Organization of the United Nations, 2014, Christopher Somerville, Moti Cohen, Edoardo Pantanella, Austin Stankus and Alessandro Lovatelli, Small-scale aquaponic food production, http://www.fao.org/3/a-i4021e.pdf. Reproduced with permission.
Management practices for fish
Original publication · First published on FarmHub Learn · Food and Agriculture Organization of the United Nations
Adding fish to a new aquaponic unit is an important event. It is best to wait until the initial cycling process is totally completed and the biofilter is fully functioning. Ideally, the ammonia and nitrite are at zero and nitrates are beginning to rise. This is the safest time to add fish. If it is decided to add fish before cycling, then a reduced number of fish should be added. This time will be very stressful for the fish, and water changes may be necessary. Cycling the system with fish can actually take longer than fish-less cycling.
The fish must be properly acclimatized to the new water. Be sure to match the temperature and pH, and always acclimatize the fish slowly (as described in Section 7.5). When purchasing fingerlings from a local hatchery, make sure the fish are healthy and check carefully for any signs of disease.
Fish feeding and growth rates
The method of calculating the fish feed using the feed rate ratio applies to mature systems during the grow-out stage of the fish and needs further consideration here. Using the same example from Section 8.1.1, the target biomass for a 1 000 litre tank is 10-20 kg. This would be about 40 harvest-size tilapia. However, during the first 2-3 months, the fish are small and do not eat as much as was calculated (200 g of feed per day) to supply nutrients for the whole grow bed. More specifically, newly stocked fingerling-sized fish weigh about 50 grams. Juvenile fish can be fed about 3 percent of their body weight per day. Therefore, an initial stocking of 40 fingerlings would weigh 2 000 g, and together they would eat approximately 60 g of fish feed per day.
A low initial stocking density is a good practice for immature aquaponic systems because it gives the biofilter additional time to develop and allows the plants time to grow and filter more nitrate. The recommendation is to estimate feeding based on body weight, but to carefully monitor feeding behaviour and adjust the ration accordingly. As the fish grow, they begin to eat more food. Moreover, it is recommended to provide a diet comparatively richer in protein to juvenile fish, if different feeds formulations are available and feasible.
After 2-3 months feeding at this rate, the 40 fish will have grown to 80-100 grams each and weigh a total of 3 200-4 000 g. At this point, they should be able to eat 80-100 g of feed per day, which is still only half of that calculated by the feed rate ratio in the earlier example. Continue to feed the fish as much as they will eat, but increase the ration slowly to prevent wasted food. Within a few more months, these same fish will each weigh 500 g with a total biomass of 20 000 grams and eat 200 g of fish feed per day. For tilapia grown in good water quality at 25 °C, it takes 6-8 months to grow from as stocking size of 50 g to a harvest size of 500 g.
Make sure to divide the feeding into morning and afternoon rations. Moreover, juvenile fish benefit from an additional lunch-time feeding. Splitting the ration is healthier for the fish and also healthier for the plants, providing an even distribution of nutrients throughout the day. Spread the feed across the entire surface of the water so all the fish can eat without injuring one another or hitting the side of the tank. Avoid scaring the fish during feeding by refraining from sudden movements. Stand still and observe the fish. Always remove any uneaten fish food after 30 minutes, and adjust the next feeding ration accordingly. If there is no food left after 30 minutes, increase the ration; if there is a lot left, decrease the ration.
A major indicator of healthy fish is a good appetite, so it is important to observe their general feeding behaviour. If their appetite declines, or if they stop feeding altogether, this is a major sign that something is wrong with the unit (most probably poor water quality). Moreover, fish appetite is directly related to water temperature, particularly for tropical fish such as tilapia, so remember to adjust or even stop feeding during colder winter months.
Harvesting and staggered stocking
A constant biomass of fish in the tanks ensures a constant supply of nutrients to the plants. This ensures that the fish eat the amount of feed calculated using the feed rate ratio. The previous example shows how the feeding ration depends on the size of the fish, and small fish are not be able to eat enough feed to supply the full growing area with adequate nutrients. To achieve a constant biomass in the fish tanks, a staggered stocking method should be adopted. This technique involves maintaining three age classes, or cohorts, within the same tank. Approximately every three months, the mature fish (500 g each) are harvested and immediately restocked with new fingerlings (50 g each). This method avoids harvesting all the fish at once, and instead retains a more consistent biomass.
Table 8.2 outlines the potential growth rates of tilapia in one tank over a year using the staggered stocking method. The important aspect of this table is that the total weight of the fish varies between 10-25 kg, with an average biomass of 17 kg. This table is a basic guideline depicting optimum conditions for fish growth. In reality factors such as water temperature and stressful environments for fish will distort the figures presented here.
TABLE 8.2
Potential growth rates of tilapia in one tank over a year using the staggered stocking method
| Month | Dec. | Jan. | Feb. | Mar. | Apr. | May | Jun. | Jul. | Aug. | Sep. | Oct. | Nov. | Dec. |
|---|---|---|---|---|---|---|---|---|---|---|---|---|---|
| Stocking round | Weight (kg) | Weight (kg) | Weight (kg) | Weight (kg) | Weight (kg) | Weight (kg) | Weight (kg) | Weight (kg) | Weight (kg) | Weight (kg) | Weight (kg) | Weight (kg) | Weight (kg) |
| 1 | 1.5 | 3.75 | 6.0 | 8.25 | 10.5 | 12.75 | 15.0* | ||||||
| 2 | 1.5 | 3.75 | 6.0 | 8.25 | 10.5 | 12.75 | 15.0* | ||||||
| 3 | 1.5 | 3.75 | 6.0 | 8.25 | 10.5 | 12.75 | 15.0* | ||||||
| 4 | 1.5 | 3.75 | 6 | 8.25 | |||||||||
| 5 | 1.5 | ||||||||||||
| Total fish mass (kg) | 1.50 | 3.75 | 6.0 | 9.75 | 14.25 | 18.75 | 24.75-9.75 | 14.25 | 18.75 | 24.75 -9.75 | 14.25 | 18.75 | 24.75 -9.75 |
| Action | Restock harvest | Restock harvest | Restock harvest |
Notes:
Fingerling tilapia (1.5 kg = 50 g/fish × 30 fish) are stocked every three months. Each fish survives and grows to harvest size (15 kg = 500 g/fish × 30 fish) in six months. The asterisk indicates harvest. The range during harvest/stocking months accounts for the range if not all 30 fish are taken at once, i.e. the 30 mature fish are harvested throughout the month. This table serves only as a theoretical guide to illustrate staggered harvest and stocking in ideal conditions.
If it is not possible to obtain fingerlings regularly, an aquaponic system can be still managed by stocking a higher number of juvenile fish and by progressively harvesting them during the season to maintain a stable biomass to fertilize the plants. Table 8.3 shows the case of a system stocked every six months with tilapia fingerlings of 50 g. In this case, the first harvest starts from the third month onward. Various combinations.
TABLE 8.3
Potential growth rates of tilapia in one tank over a year using a progressive harvest technique
| Month | Dec. | Jan. | Feb. | Mar. | Apr. | May | Jun. | Jul. | Aug. | Sep. | Oct. | Nov. | Dec. |
|---|---|---|---|---|---|---|---|---|---|---|---|---|---|
| Stocking round 1 | |||||||||||||
| Number of fish in tank | 80 | 80 | 70 | 60 | 50 | 40 | 30 | 10 | |||||
| Fish weight (g) | 50 | 125 | 200 | 275 | 350 | 425 | 500 | 575 | |||||
| Cohort biomass (kg) | 4 | 10 | 14 | 17 | 18 | 17 | 15 | 5.8 | |||||
| Stocking round 2 | |||||||||||||
| Number of fish in tank | 80 | 80 | 70 | 60 | 50 | 40 | 30 | ||||||
| Fish weight (g) | 50 | 125 | 200 | 275 | 350 | 425 | 500 | ||||||
| Cohort biomass (kg) | 4 | 10 | 14 | 17 | 18 | 17 | 15 | ||||||
| Total tank biomass (kg) | 4 | 10 | 14 | 17 | 18 | 17 | 19 | 15.8 | 14 | 17 | 18 | 17 | 15 |
Notes:
Tilapia fingerling are stocked every six months. Staggered harvest starts from the third month to keep the total fish below the maximum stocking biomass of 20 kg/m3. The table shows the theoretical weight of each batch of harvested fish along the year if fish are reared in ideal conditions.
in stocking frequency, fish number and weight can apply, providing that fish biomass stands below the maximum limit of 20 kg/m3. If the fish are mixed-sex, the harvest must firstly target the females to avoid breeding when they reach sexual maturity from the age of five months. Breeding depresses the whole cohort. In the case of mixed-sex tilapia, fish can be initially stocked in a cage and males can then be left free in the tank after sex determination.
Remember that adult tilapia, catfish and trout will predate their smaller siblings if they are stocked together. A technique to keep all of these fish safely in the same fish tank is to isolate the smaller ones in a floating frame. This frame is essentially a floating cage, which can be constructed as a cube with PVC pipe used as frame and covered with plastic mesh. It is important to ensure that larger fish cannot enter the floating cage over the top, so make sure that the sides extend at least 15 cm above the water level. Each of the vulnerable size classes should be kept in separate floating frames in the main fish tank. As the fish grow large enough not to be in danger, they can be moved into the main tank. With this method, it is possible to have up to three different stocking weights in one tank, so it is important that the fish feed pellet size can be eaten by all sizes of fish. Caged fish also have the advantage of being closely monitored to determine the FCR by measuring the weight increment and weight of the feed over a period.
Fish - summary
-
Add fish only after the fish-less cycling process is complete, if applicable.
-
Feed the fish as much as they eat in 30 minutes, two times per day. Always remove uneaten feed after 30 minutes. Record total feed added. Balance the feeding rate with the number of plants using the feed rate ratio, but avoid over- or under- feeding the fish.
-
Fish appetite is directly related to water temperature, particularly for topical fish such as tilapia, so remember to adjust feeding during colder winter months.
-
A fingerling tilapia (50 g) will reach harvest size (500 g) in 6-8 weeks under ideal conditions. Staggered stocking is a technique which involves stocking a system with new fingerlings each time some of the mature fish are harvested. It provides a way of maintaining relatively constant biomass, feeding rate and nutrient concentration for the plants.
Source: Food and Agriculture Organization of the United Nations, 2014, Christopher Somerville, Moti Cohen, Edoardo Pantanella, Austin Stankus and Alessandro Lovatelli, Small-scale aquaponic food production, http://www.fao.org/3/a-i4021e.pdf. Reproduced with permission.
Management practices for plants
Original publication · First published on FarmHub Learn · Food and Agriculture Organization of the United Nations
Seedlings can be planted into the system as soon as nitrates are detected. Expect these first plants to grow slowly and exhibit some temporary deficiencies because the nutrient supply in the water is temporarily small. It is recommended to wait 3-4 weeks to allow the nutrients to accrue. In general, aquaponic systems show a slightly lower growth rate than soil or hydroponic production in the first six weeks. However, once a sufficient nutrient base has been built within the unit (1-3 months) the plant growth rates become 2-3 times faster than in soil.
Review of planting guidelines
Plant selection
It is best to start a new aquaponic system with fast-growing robust plants with a low nutrient demand. Some examples are leafy green vegetables, such as salads, or nitrogen- fixing plants, such as beans or peas. After 2-3 months, the system is ready for larger fruiting vegetables that demand a greater amount of nutrients.
Plant spacing
Seedlings can be planted using a slightly denser spacing than for most vegetables in soil because in aquaponics the plants do not compete for water and nutrients. Even so, the plants still need enough room to reach their mature size and to avoid reciprocal competition for light, which would depress their marketable quality or favour vegetative growth instead of fruits. In addition, consider shading effects of the full-grown plants, which allows for the contemporary cropping of shade-tolerant species next to taller plants.
Supplementing iron
Some new aquaponic units experience iron deficiencies in the first 2-3 months of growing as iron is important during the early stages of plant growth and is not abundant in fish feed. Thus, it may be necessary to initially add chelated iron (soluble iron in powder form) to the unit to meet the requirements for plants. The recommendation is to add 1-2 mg/litre for the first 3 months of starting a unit, and again when iron deficiencies are present. Chelated iron can be bought from agricultural suppliers in powder form. Iron can also be supplemented by using aquaponics-safe organic fertilizers such as compost or seaweed tea, as iron is abundant in both. Section 9.1.1 discusses aquaponics-safe organic fertilizers.
Establishing a plant nursery
Vegetables are the most important output for small-scale aquaponic production. It is essential that only strong healthy seedlings are planted. Moreover, the planting methods applied must avoid transplant shock as much as possible. Thus, the recommendation is to establish a simple plant nursery to ensure an adequate supply of healthy seedlings ready to be planted into the aquaponic units. It is always best to have an excess of plants ready to go into the system, and often waiting for seedlings is a source of production delay.
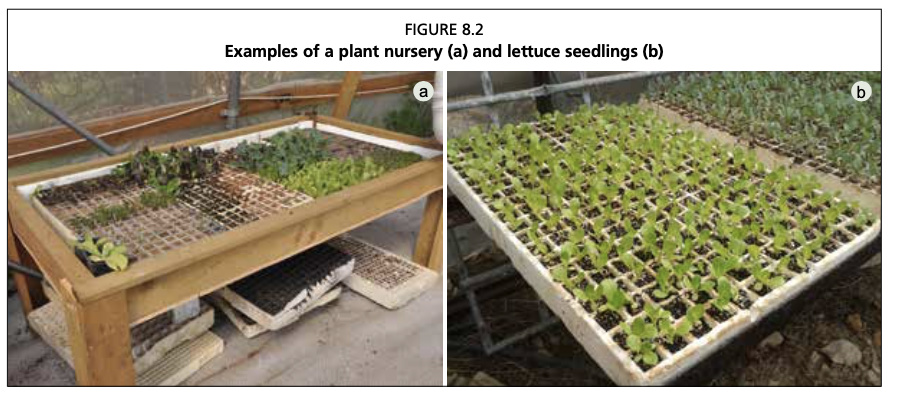
A simple nursery bed can be constructed using horizontal wood lengths lined with polyethylene liner, as shown in Figure 8.2. Water is pumped into the bed for about half an hour each day (controlled by a simple electric timer), allowing water and moisture to soak into the growing media. The water is then slowly drained down into a tank below. This cycle is repeated daily in order to prevent water logging of the seedlings. Too much moisture increases the threat of fungal infections.
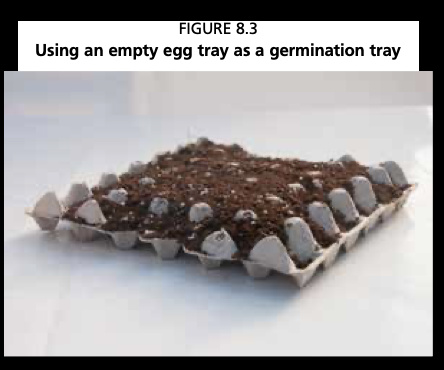
Polystyrene propagation trays are placed into the nursery bed and are filled with soil, inert grow media such as rockwool, peat, coco fibre, vermiculite, perlite or a potting mix with a combination of the various types of growing medium. Simpler alternatives for propagation trays are also possible using recyclable materials such as empty egg boxes (Figure 8.3). Choose propagation trays that allow adequate distance between seedlings in order to favour good growth without competition for light. Box 4 lists seven steps for sowing seeds.
Direct seeding in media beds
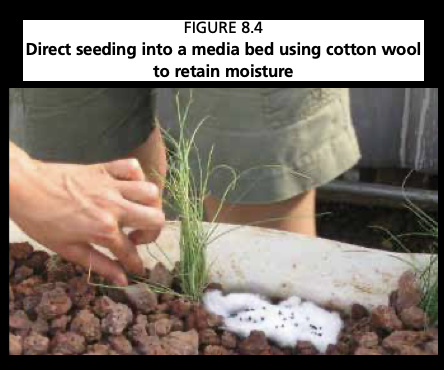
It is possible to sow seeds straight into the media bed (Figure 8.4). If using a flood-and- drain mechanism (e.g. bell siphon) the seeds may be washed around. Therefore, the siphon should be removed while sowing seeds in the bed, and then replaced when the first leaves begin to appear.
Transplanting seedlings
Transplanting seedlings obtained from soil beds is not recommended; it should only be done if strictly necessary. In this case, all of the soil needs to be washed out from the root system very gently (Figure 8.5) because it may carry plant pathogens. This washing process is very stressful for seedlings and it is possible to lose 4-5 days of growth as the plant adjusts to new conditions. Thus, it is preferable to start seeds using inert media (rockwool, vermiculite or coco fibre) in propagation trays as explained above. In this way, the seedlings can be transplanted with minimal shock. Larger plants from pots can also be planted, although again the soil needs to be removed. Avoid transplanting in the middle of the day because plant roots are extremely sensitive to direct sun light and leaves can face water stress due to the new growing conditions. It is recommended to plant at dusk so the young seedlings have a night to acclimatize to their new environment before the morning sun.
BOX 4 Seven steps to sow seeds using homemade propagation trays
|
Media bed planting
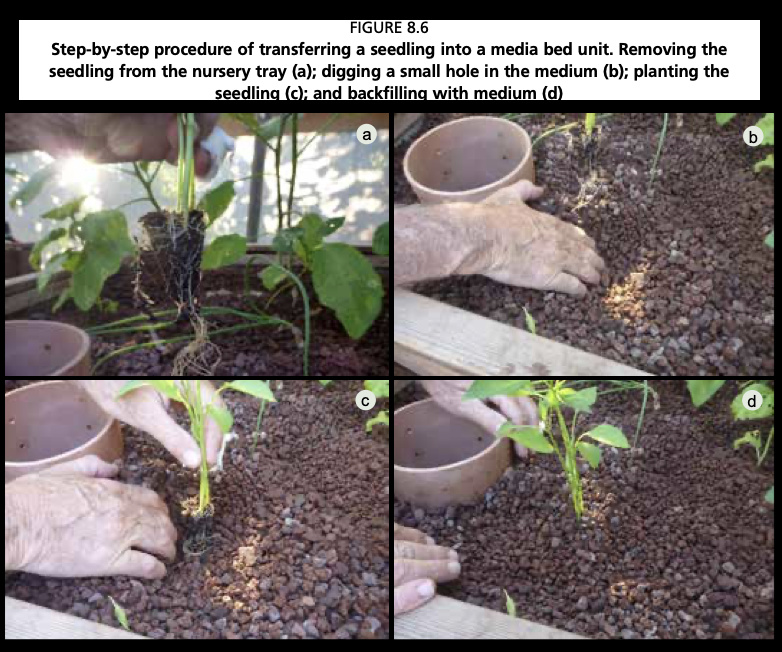
When planting in volcanic gravel or any other growing media recommended in Chapter 6, simply push aside the gravel and dig a hole that is big enough to contain the plant (Figure 8.6). Plant at the highest point of flooding in the media bed (about 5-7 cm below the surface of the gravel) so the roots are partially submerged in water. Do not plant too deeply, which would allow water to contact the stem or leaves and could lead to disease (collar rot).
NFT planting
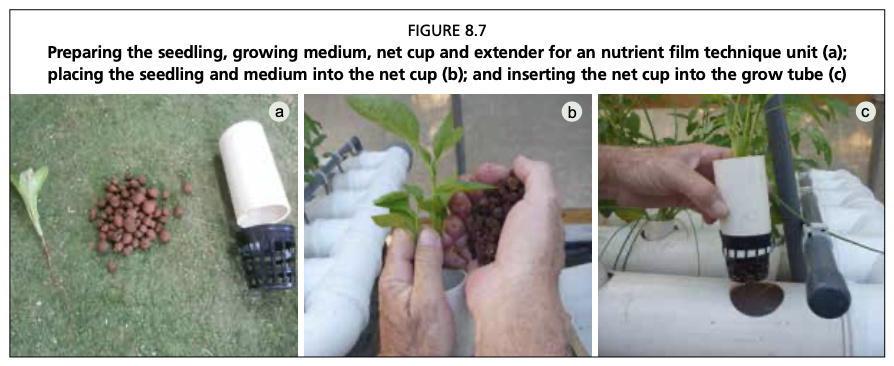
To plant in the grow pipes, the seedling needs to be supported with a short pipe or net cup containing 3-4 cm of gravel or other growing media (Figure 8.7). The rest of the net cup should be filled with a mixture of gravel and a moisture-retaining medium such as compost or coco fibre. The medium helps retain moisture because the young plant roots only barely touch the water flow inside the grow pipe. If coco fibre or compost is unavailable, then any standard medium will suffice. After one week, the roots should have extended out through the net up and into the grow pipe with full access to water flowing along the bottom of the pipe. In addition, wicks can be extended from the bottom of the net cup into the stream of water, if necessary.
DWC planting
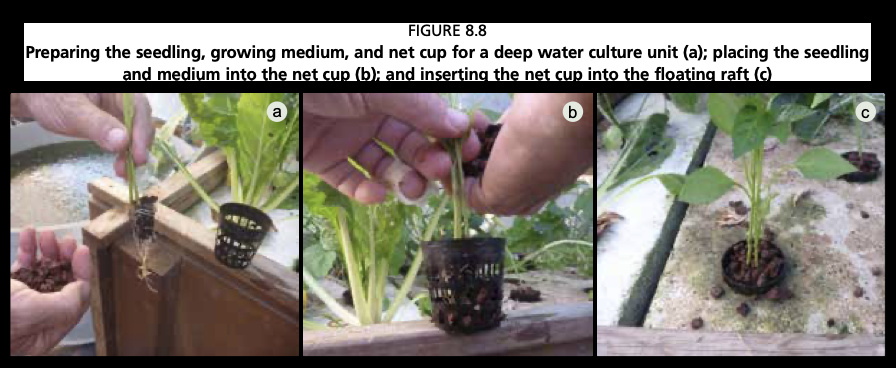
Similar to planting in NFT systems, DWC systems need the plant to be supported using a small net cup filled with 3-4 cm of inert medium (Figure 8.8). When the seedling is adequately supported, place it into one of the holes made in the polystyrene sheets to float on top of the water. The bottom of the net cup should just touch the water level.
Harvesting plants
In 1-2 months, leafy green vegetables should be ready to harvest. After three months, the unit should also have enough of a nutrient base to begin planting larger fruiting vegetables. The following points below detail the final guidelines for growing plants after the initial three-month period.
Staggered planting and harvesting
As discussed in Chapter 6, it is worth staggering the planting over time in order to prevent harvesting the entire crop all at once. If this were to happen, nutrient levels would decrease just before harvest, which might create nutritional problems for the plants, and spike after the harvest, which would stress the fish. Moreover, staggered planting allows for continual harvest and transplant of vegetables and ensures constant nutrient uptake and water filtration.
Harvesting approaches
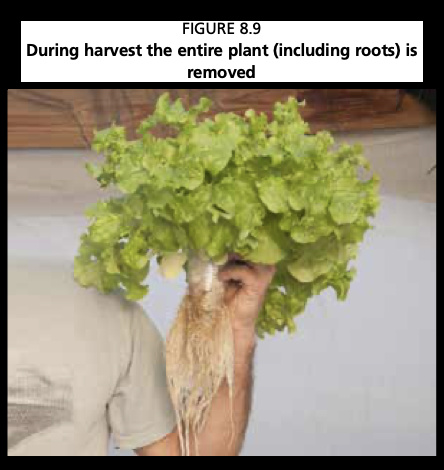
When harvesting full plants from media beds (i.e. lettuce), make sure the entire root system is removed. In addition, shake the gravel stuck in between the roots and place the gravel back in the media bed. In NFT and DWC pipes/canals also make sure the whole root system is removed (Figure 8.9). Place the discarded plant roots into a compost bin to recycle the plant waste. Leaving roots and leaves in the system can encourage disease. When harvesting vegetables use a sharp clean knife. To prevent any bacteria contamination, ensure that aquaponic water does not wet the leaves. Place harvested plants into a clean bag and wash and chill the crops as soon as possible to maintain freshness.
Managing plants in mature systems
Stabilizing pH
It is vital for good plant growth to maintain the pH between 6 and 7, so plants have access to all the nutrients available in the water. Add small amounts of base or buffer whenever the pH approaches 6.0 in order to maintain optimum pH levels as described in Section 3.6. Add rainwater or correct with acid any alkalinity-rich water only if the hardness level in the aquaponic system is too high to prevent nitrifying bacteria from naturally lowering the pH to optimal levels. Treat the water with acid outside the aquaponic system, and pour the water into the system after checking the pH.
Organic fertilizers
If deficiencies do occur, it is necessary to add outside nutrients. Organic liquid fertilizer can be used as either diluted foliar feed for plant leaves or poured straight into the root zone. Chapter 9 discuses methods to produce simple home-made fertilizers that are aquaponic-safe. Compost tea and seaweed tea are recommended. Deficiencies are discussed in Section 6.2.3. Deficiencies often occur when there are too many plants for the number of fish, or when feeding is reduced during winter months. Before adding fertilizers, be sure to check pH to make sure there is no nutrient lockout.
Pests and disease
Be sure to try to prevent pests using the IPPM techniques discussed in Section 6.5. If pests remain a problem, begin by using the mechanical removal techniques before considering sprays. Only use aquaponic-safe remedies, such as: plant extracts or repellents, biological insecticides (Bacillus thuringiensis and Beauveria bassiana), soft soaps, ash, plant oils or extracts of essential oils, chromatic/attractant traps, and external attractant plants treated with insecticides. Regardless, avoid letting the spray enter the water.
Follow seasonal planting advice
To an extent, aquaponic food production methods provide a means to extend planting seasons, particularly if the unit is housed inside a greenhouse. However, it is still strongly recommended to follow local seasonal planting advice. Plants grow better in the season and environmental conditions to which they are adapted.
Plants - summary
-
Use plants with low nutrient demands for the first few months, i.e. lettuce and beans/peas.
-
Plants with high nutrient demands can be planted after the first 3-6 months.
-
Use plants recommended for aquaponics, and follow seasonal planting guides for the location.
-
Establish a plant nursery to ensure adequate numbers of healthy seedlings.
-
Transplant adequately grown and strong seedlings that have a well-developed root system.
-
Gently remove excess substrate from the roots before planting into the system.
-
Leave sufficient spacing in between plants according to their size when mature.
-
Plan a staggered harvesting system.
-
Organic fertilizers may be necessary if deficiencies occur.
-
Maintain appropriate water quality, especially a pH of 6-7.
Source: Food and Agriculture Organization of the United Nations, 2014, Christopher Somerville, Moti Cohen, Edoardo Pantanella, Austin Stankus and Alessandro Lovatelli, Small-scale aquaponic food production, http://www.fao.org/3/a-i4021e.pdf. Reproduced with permission.
New aquaponic systems and initial management
Original publication · First published on FarmHub Learn · Food and Agriculture Organization of the United Nations
Building and preparing the unit
Detailed step-by-step building instructions are provided in Appendix 8. Once the unit is complete, it is time to prepare the system for routine function. Although aquaponic unit management does not require excessive time and effort, it is important to remember that a well-functioning system requires a minimum of 10-20 minutes of maintenance every day. Before stocking a new system with fish and planting the vegetables, it is crucial to ensure that all of the equipment is working properly. The most important aspects to check are the water pump, the air pump and water heaters (where applicable). It is essential to check that the NFT pipes and media beds are steady and balanced horizontally. Start running water in the system and make sure that there are no leaks or loose plumbing connections. If there are, tighten or fix them immediately. Section 9.3 provides further methods to secure the water levels and prevent catastrophic loss-of-water events. Once built, cycle the water for at least two days in order to let any chlorine dissipate. This process can be accelerated using heavy aeration. This is not necessary where the source water contains no chlorine, such as rainwater or filtered water.
Media bed unit preparation
The growing medium (volcanic gravel, expanded clay) should be well washed. Fill the beds with the medium and let the water run through it; the water should be clear. Remove any sedimentation (if present) by flushing out the beds with water. If using an electric timer to flood and drain the beds, it is important to synchronize the time it takes to fill the growing beds and the flow rate of the water entering the bed. If using a bell siphon, the water flow rate should be adjusted to ensure the auto siphon function. The water flow rate must be enough to activate the siphon, but not so strong that it prevents the suction from stopping.
NFT and DWC unit preparation
Make sure that the water flowing into each grow pipe or canal is flowing at the right rate (1-2 litres/min for NFT; 1-4 hours retention time for DWC). Higher flow rates have a negative impact on the plant roots, while lower flow rates do not supply adequate nutrients or oxygen.
System cycling and establishing the biofilter
Once the unit has passed the initial component checks and has been running for 2-3 days with no problems, it is time to cycle the unit. As discussed in Chapter 5, system cycling is the term that describes the initial process of building a bacterial colony in a new aquaponic unit. Normally, this is a 3-6 week process that involves introducing an ammonia source in the unit to feed the nitrifying bacteria and help them proliferate. The steps involved have been outlined in Chapter 5 and they should be followed for every new unit.
During the cycling process, it is vital to test ammonia, nitrite and nitrate levels every 3-5 days to make sure the ammonia concentrations do not become harmful for bacteria (> 4 mg/litre). If they do, a water change is necessary. The unit has completed the cycling process when nitrate levels begin to rise and ammonia and nitrite levels fall close to zero.
Source: Food and Agriculture Organization of the United Nations, 2014, Christopher Somerville, Moti Cohen, Edoardo Pantanella, Austin Stankus and Alessandro Lovatelli, Small-scale aquaponic food production, http://www.fao.org/3/a-i4021e.pdf. Reproduced with permission.
Routine management practices
Original publication · First published on FarmHub Learn · Food and Agriculture Organization of the United Nations
Below are daily, weekly and monthly activities to perform to ensure that the aquaponic unit is running well. These lists should be made into checklists and recorded. That way, multiple operators always know exactly what to do, and checklists prevent carelessness that can occur with routine activities. These lists are not meant to be exhaustive, but merely a guideline based on the systems described here in this publication and as a review of the management activities.
Daily activities
-
Check that the water and air pumps are working well, and clean their inlets from obstructions.
-
Check that water is flowing.
-
Check the water level, and add additional water to compensate for evaporation, as necessary.
-
Check for leaks.
-
Check water temperature.
-
Feed the fish (2-3 times a day if possible), remove uneaten feed and adjust feeding rates.
-
At each feeding, check the behaviour and appearance of the fish.
-
Check the plants for pests. manage pests, as necessary.
-
Remove any dead fish. Remove any sick plants/branches.
-
Remove solids from the clarifier and rinse any filters.
Weekly activities
-
Perform water quality tests for pH, ammonia, nitrite and nitrate before feeding the fish.
-
Adjust the pH, as necessary.
-
Check the plants looking for deficiencies. Add organic fertilizer, as necessary.
-
Clear fish waste from the bottom of fish tanks and in the biofilter.
-
Plant and harvest the vegetables, as required.
-
Harvest fish, if required.
-
Check that plant roots are not obstructing any pipes or water flow.
Monthly activities
-
Stock new fish in the tanks, if required.
-
Clean out the biofilter, clarifier and all the filters.
-
Clean the bottom of the fish tank using fish nets.
-
Weigh a sample of fish and check thoroughly for any disease.
Source: Food and Agriculture Organization of the United Nations, 2014, Christopher Somerville, Moti Cohen, Edoardo Pantanella, Austin Stankus and Alessandro Lovatelli, Small-scale aquaponic food production, http://www.fao.org/3/a-i4021e.pdf. Reproduced with permission.
Safety at work
Original publication · First published on FarmHub Learn · Food and Agriculture Organization of the United Nations
Safety is important for both the human operator and the system itself. The most dangerous aspect of aquaponics is the proximity of electricity and water, so proper precautions should be taken. Food safety is important to ensure that no pathogens are transferred to human food. Finally, it is important to take precautions against introducing pathogens to the system from humans.
Electrical safety
Always use a residual-current device (RCD). This is a type of circuit breaker that will cut the power to the system if electricity grounds into the water. The best option is to have an electrician install one at the main electric junction. Alternatively, RCD adaptors are available, and inexpensive, at any hardware or home improvement store. An example of an RCD can be found on most hairdryers. This simple precaution can save lives. Moreover, never hang wires over the fish tanks or filters. Protect cables, sockets and plugs from the elements, especially rain, splashing water and humidity. There are outdoor junction boxes available for these purposes. Check often for exposed wires, frayed cables or faulty equipment, and replace accordingly. Utilize "drip loops" where appropriate to prevent water from running down a wire into the junction.
Food safety
Good agricultural practices (GAPs), should be adopted to reduce as far as possible any food-borne illnesses, and several apply to aquaponics. The first and most important is simple: always be clean. Most diseases that affect humans would be introduced into the system by the workers themselves. Use proper hand-washing techniques and always sanitize harvesting equipment. When harvesting, do not let the water touch the produce; do not let wet hands or wet gloves touch the produce either. If present, most pathogens are in the water and not on the produce. Always wash produce after harvesting, and again before consumption.
Second, keep soil and faeces from entering the system. Do not place harvesting equipment on the ground. Prevent vermin, such as rats, from entering the system, and keep pets and livestock away from the area. Warm-blooded animals often carry diseases that can be transferred to humans. Prevent birds from contaminating the system however possible, including through the use of exclusion netting and deterrents. If using rainwater collection, ensure that birds are not roosting on the collection area, or consider treating the water before adding it to the system. Preferably do not handle the fish, plants or media with bare hands, instead use disposable gloves.
General safety
Often aquaponic units, and farms and gardens in general, have other general hazards that can be avoided with simple precautions. Avoid leaving power cords, air lines or pipes in walkways, as they can pose a trip hazard. Water and media are heavy, so use proper lifting techniques. Wear protective gloves when working with the fish and avoid the spines. Treat any scrapes and punctures immediately with standard first-aid procedures - washing, disinfecting and bandaging the wound. Seek medical attention, if necessary. Do not let blood or body fluids enter the system, and do not work with open wounds. When constructing the system, be aware of saws, drills and other tools. Keep acids and bases in safe storage areas, and use proper safety gear when handling these chemicals. Always keep all dangerous chemicals and objects properly stored and away from children.
Safety - summary
-
Use RCD on electric components to avoid electrocution.
-
Shelter any electric connections from rain, splashes and humidity using correct equipment.
-
Adopt GAPs to prevent contamination of produce. Always keep harvesting tools clean, wash hands often and wear gloves. Do not let animal faeces contaminate the system.
-
Do not contaminate the system by using bare hands in the water.
-
Avoid trip hazards by keeping a neat workstation.
-
Wear gloves when handling fish and avoid spines.
-
Wash and disinfect wounds immediately. Do not work with open wounds. Do not let blood enter the system.
-
Be careful with power tools and dangerous chemicals, and wear protective gear.
Source: Food and Agriculture Organization of the United Nations, 2014, Christopher Somerville, Moti Cohen, Edoardo Pantanella, Austin Stankus and Alessandro Lovatelli, Small-scale aquaponic food production, http://www.fao.org/3/a-i4021e.pdf. Reproduced with permission.
Troubleshooting for common problems in aquaponic systems
Original publication · First published on FarmHub Learn · Food and Agriculture Organization of the United Nations
Table 8.4 lists the most common problems when running an aquaponic unit. If anything appears out of the ordinary, immediately check that the water pump and air pumps are functioning. Low DO levels, including accidental leaks, are the number one killer in aquaponic units. As long as the water is flowing, the system is not in an emergency phase and the problem can be addressed systematically and calmly. The first step is always to conduct a full water quality analysis. Understanding the water quality provides feedback essential for determining how to solve any problem.
TABLE 8.4
Electricity/pump and system problems
Pump not working; electricity is off.
- Reason: No electric power.
- Problem: DO will decrease.
- Solution:
- If electricity supply is unreliable, a DC backup power system should be installed.
- Take water from the sump tank and pour into the fish tank, temporarily replenishing oxygen levels; repeat this process every 1–2 hours until power returns.
- Install a 200 litre container above the fish tank that can release a slow stream of water into the fish tank, creating bubbles.
Pump not working; electricity is on.
- Reason: Pump is either broken, faulty or clogged.
- Problem: DO will decrease.
- Solution: Check and clear any obstructions on pre-filter or in pipes. Replace pump immediately, if faulty.
Pool of water underneath system or water unusually low.
- Reason: Leaks or cracks.
- Problem: All water will drain out, stressing and eventually killing the fish and plants.
- Solution: Fix any leaks or holes immediately. Use standpipe to prevent fish tank from losing water. Replenish water.
Water in system and sides of fish tank looks green.
- Reason: Algal bloom.
- Problem: DO will decrease.
- Solution: Shade the system, and physically remove mature blooms of algae.
Water quality problems
Ammonia or nitrite> 1 mg/litre.
-
Reason:
- The bacteria are not functioning.
- Too many fish for the size of the biofilter.
- Accumulated non-living biomass: uneaten food, dead fish, solid wastes.
-
Problem: Fish will be stressed and die.
-
Solution:
- Immediately change 1/3–1/2 of system water with new water.
- Remove all uneaten food, dead fish or build-up of solid waste in the tank.
- Stop feeding until levels decrease.
- Make sure pH and temperature are optimum for bacteria.
- If nitrite is high, add 1 g of salt for every litre to immediately neutralize the toxic water quality threat. Afterwards, change the entire water volume over a period of 2 weeks.
- Recalculate component ratios, biofilter size and feeding regime.
Nitrate levels> 120 mg/litre for a number of weeks.
- Reason: High feed rate ratio.
- Problem: No immediate problems, but toxicities may occur if nitrate keeps increasing.
- Solution: Exchange water and use dumped water to irrigate crops.
Carbonate hardness (KH) is 0 mg/litre.
- Reason: All of the carbonate is used by the acid created in the aquaponic unit.
- Problem: The pH of the water will change quickly, stressing the fish and plants.
- Solution: Add calcium carbonate (limestone gravel or shells) to the unit.
Fish Problems
Fish are piping at water surface.
- Reason: Oxygen levels are too low.
- Problem: Fish will be highly stressed and die.
- Solution:
- Make sure electricity is on and pump is fully working.
- Make sure the bell siphon and air pumps are functional.
- Make sure system tanks are fully covered to reduce temperature.
- Add supplemental aeration.
Fish are not eating
-
Reason:
- DO is low.
- Ammonia and/or nitrite are too high.
- pH is too high or too low.
- Fish have diseases.
-
Problem: Fish are stressed and will develop disease or die.
-
Solution:
- Perform water quality tests for ammonia, pH, nitrite and nitrate.
- Identify why fish are stressed (pH increase, ammonia or nitrite increase, oxygen decrease, organic pollution, disease) and fix the problem.
Water temperature is too high (>33 °C) or too low (<15 °C).Fish are not eating
- Reason: Climate.
- Problem: If temperature is too high: fish will stop eating and plants will begin to wilt and die.If temperature is too low: bacteria will stop working, some fish may not eat.
- Solution:
- In summer, make sure system tanks are shaded so the water stays relatively cool.
- In winter, first isolate and then insulate the fish tanks. Then, use solar or electric heaters, and reduce the amount of fish food and vegetables growing in the unit.
- Change fish species with ones more appropriate for that climate.
Plant Problems
Plants are not growing and/or leaves are changing colour.
- Reason: Plants are deficient in some essential nutrients (or temperature is too high for certain plants, plants are diseased).
- Problem: Plants will not grow or produce fruit.
- Solution:
- Make sure water quality is optimum for plants.
- Check nitrate levels: if they are too low, slowly increase fish feed per day.
- Check if there is any root/stem disease.
- Add aquaponic-safe fertilizer to plants.
Nitrate levels are high yet plants leaves are yellowing
-
Reason:
- pH is not at optimal level (too high or low).
- Plants are deficient in some essential nutrients.
-
Problem: Plants will not grow fully or produce fruit.
-
Solution:
- Check if the yellowing is on new or old leaves. If on new, add iron up to 3 mg/ litre.
- Check pH and adjust if it is not optimum.
- Add aquaponic-safe fertilizer such as compost or seaweed tea to plants.
Vegetables surrounding the water entry pipe are thriving while other vegetables farther away are struggling.
- Reason: Vegetables around the entry pipe are taking up all the nutrients.
- Problem: Uneven growth of vegetables in media beds.
- Solution:
- Spread the water all around the grow beds using irrigation pipe with small holes.
- Remove the media bed standpipe every day to flush the water in the media bed out into the sump tank.
- Check nitrate levels; if too low, slowly increase fish feed given per day.
Source: Food and Agriculture Organization of the United Nations, 2014, Christopher Somerville, Moti Cohen, Edoardo Pantanella, Austin Stankus and Alessandro Lovatelli, Small-scale aquaponic food production, http://www.fao.org/3/a-i4021e.pdf. Reproduced with permission.
Food and Agriculture Organization of the United Nations — Christopher Somerville, Moti Cohen, Edoardo Pantanella, Austin Stankus, and Alessandro Lovatelli.
View the original source edition
Reformatted and consolidated from the original edition.